Introduction
Pattern grading is an essential technique in fashion design that involves scaling a pattern from one size to another, ensuring that a design can fit various body sizes without compromising the style or fit. It’s a skill that allows designers to create an entire range of sizes for a garment, from petite to plus size, while maintaining the integrity of the original design. Whether you’re an aspiring designer or an experienced pattern maker, understanding pattern grading is crucial in the fashion industry to cater to diverse body types and improve garment accessibility.
In this article, we will delve deep into the process of pattern grading, its importance in fashion design, and the tools and techniques used by professionals to create perfectly graded patterns.
- What is Pattern Grading?
Pattern grading refers to the process of creating patterns for different sizes by proportionally increasing or decreasing the measurements of a base pattern. The base pattern is typically a sample in one standard size, and pattern grading produces the corresponding patterns for other sizes. The grading process involves modifying the dimensions of the pattern pieces (such as bust, waist, hip, and overall length) while keeping the garment’s overall shape and proportions intact.
Grading ensures that garments can be produced in multiple sizes, from small to large, so they fit different body shapes and sizes. It is essential to the fashion industry as it allows designers to make their creations accessible to a larger consumer base.
- The Importance of Pattern Grading in Fashion Design
Pattern grading is an integral part of garment production, and its importance in the fashion industry cannot be overstated. Here are some key reasons why grading is so crucial:
- Ensures Fit and Comfort: Proper grading ensures that a garment fits properly on a variety of body types. Without grading, a design made for one size would look out of proportion or uncomfortable when scaled up or down to other sizes.
- Increases Accessibility: Grading allows designers to reach a larger audience by offering garments in a wide range of sizes, from smaller to larger bodies. This makes fashion more inclusive and accessible.
- Ensures Consistency in Style: Grading helps maintain the style and silhouette of a design across various sizes. Without grading, larger sizes might lose the details, proportions, and overall aesthetic of the original design.
- Improves Business Potential: For fashion brands, grading is a way to create a larger product range that appeals to a broader customer base. More sizes mean more sales opportunities, which is vital for business growth.
- Facilitates Mass Production: In the garment industry, patterns are usually produced in standard sizes for mass production. Grading enables designers to create a set of patterns that manufacturers can use to make garments in bulk for various size ranges.
- The Basics of Pattern Grading Process
Pattern grading involves adjusting the measurements of a base pattern according to specific rules and proportions to create different sizes. This process can be done manually or using specialized software. Here’s an overview of the basic steps involved:
Step 1: Selecting the Base Size
The base size, also known as the “sample size,” is the starting point for the grading process. This is typically a medium-sized pattern (often size 8 or 10) and is chosen because it represents an average body size. The designer will base all the grading adjustments on this sample size.
Step 2: Determine the Size Range
Once the base size is selected, the next step is to determine the size range for which the pattern will be graded. Fashion companies may offer a size range that spans from XS to XL, or they may focus on more specialized size ranges such as petite, regular, and plus sizes. The size range influences the amount of grading required for each pattern piece.
Step 3: Choose the Grading Method
There are two main methods for grading patterns:
- Manual Grading: This traditional method involves making changes directly to the pattern. Grading rules are applied to each pattern piece, and the adjustments are made by hand with rulers, curves, and French curves. This process is highly precise but requires a great deal of skill.
- Computer-Aided Design (CAD) Grading: Modern fashion design has increasingly turned to technology to make grading more efficient. CAD software allows designers to input grading rules and scale patterns digitally. This method is faster and allows for greater accuracy, especially when working with a wide size range.
Step 4: Determine Grading Increment
The grading increment refers to the specific amount by which a pattern size will be altered. This increment depends on several factors, including the type of garment, the fabric used, and the brand’s size chart. Typically, increments are measured in 1/4″ or 1/8″ increments for each pattern piece.
For example, for a standard shirt pattern, the grading increment might increase the bust, waist, and hip measurements by 1/2″ per size. If a designer is creating a pattern for a size range from Small to Extra Large, they will apply this increment to all measurements on each pattern piece.
Step 5: Apply Grading to Pattern Pieces
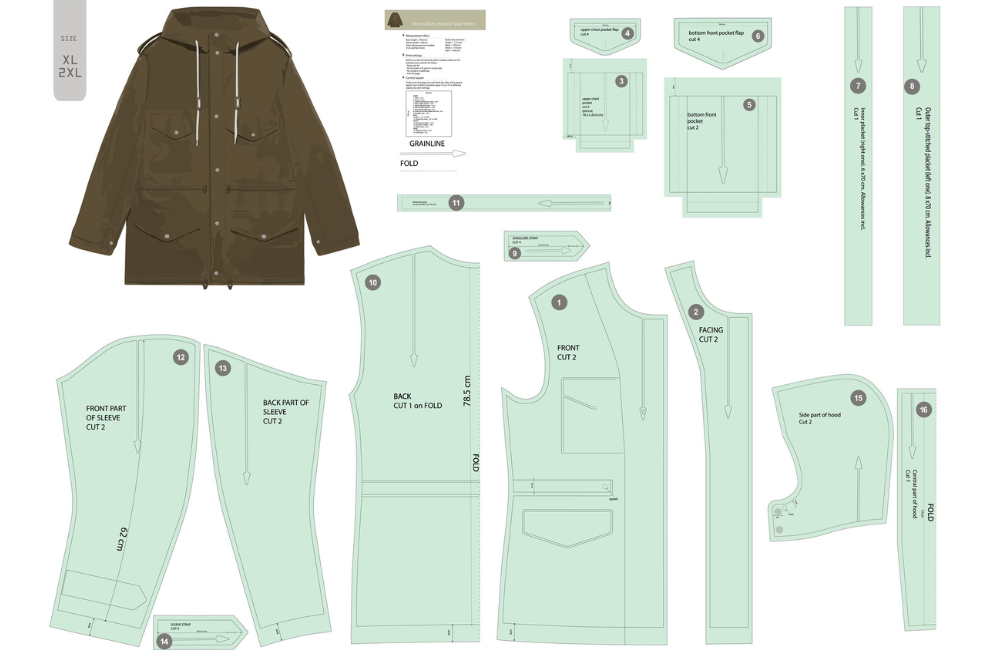
The next step is to apply the grading increment to each pattern piece. This includes the front, back, sleeves, collar, and any other components of the garment. The amount of grading applied to each section may vary depending on the piece.
For example, when grading a jacket, the chest measurement might increase in increments, while the armhole, shoulder seam, and sleeve might also be adjusted to ensure proper fit and proportions. For pants, the waist, hips, and inseam length will be graded.
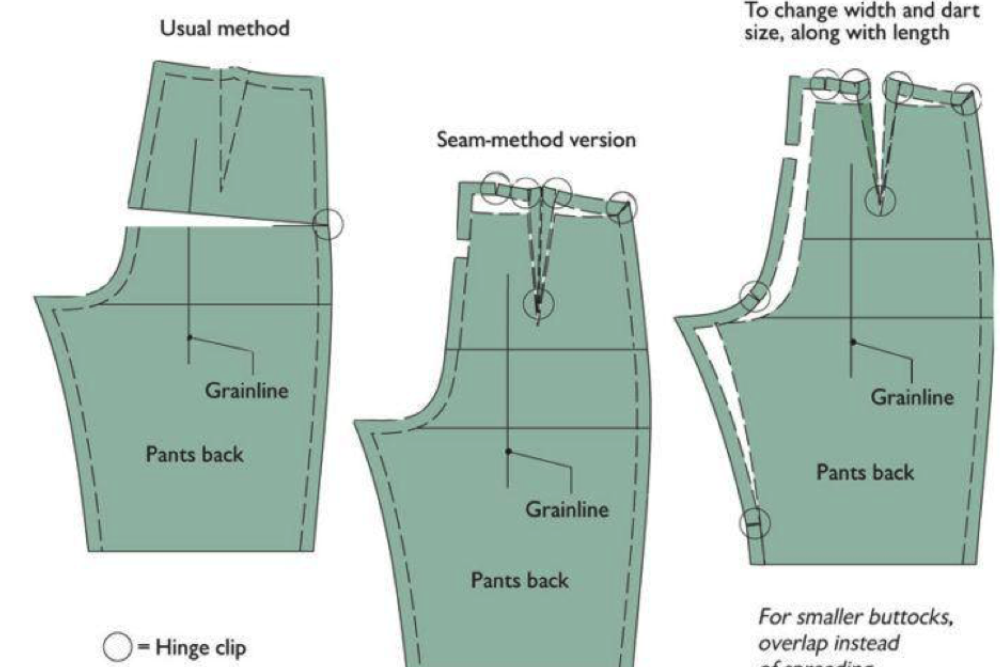
Step 6: Modify Key Design Features
Some key features of a design—such as darts, pleats, and gathers—need to be modified during the grading process to ensure they maintain their functionality and visual appeal across various sizes. For instance, larger sizes may require larger darts or additional pleats to ensure the garment retains its shape and style.
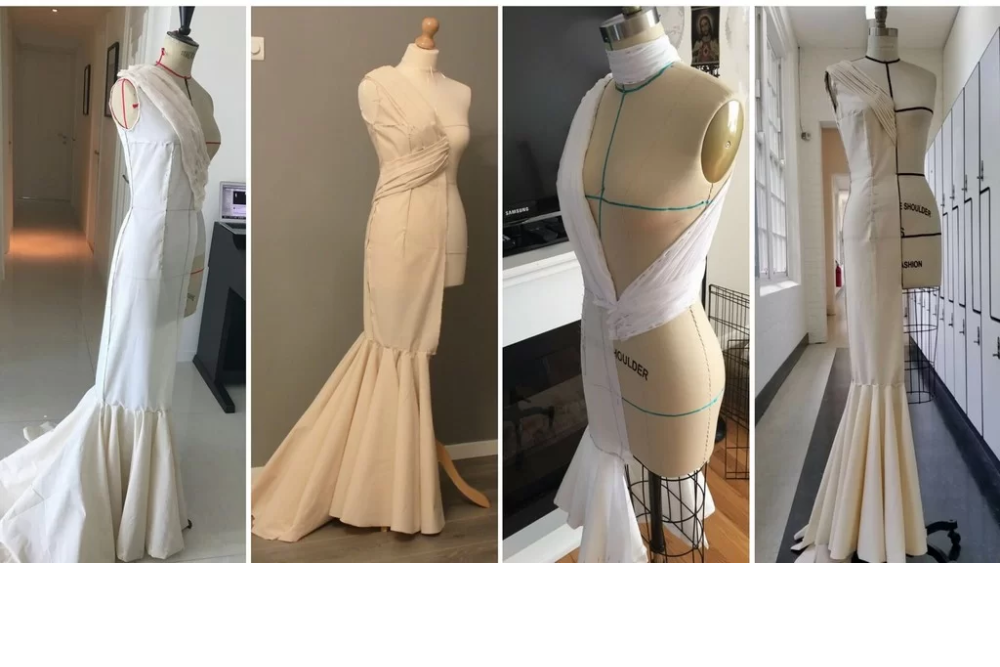
Step 7: Test the Graded Pattern
Once the grading is complete, the next step is to create a muslin or prototype sample for each new size. This sample allows the designer to test the fit and make any necessary adjustments. It’s crucial to check that the proportions of the graded pattern look balanced and that the design details remain consistent across sizes.
Step 8: Finalize the Graded Pattern
Once the test garment is produced and any adjustments are made, the final pattern is ready for production. This pattern is then used to create the garments for mass production.
- Grading Rules and Considerations
Grading is not a random process; it requires a deep understanding of how proportions change across different body sizes. Below are some of the general rules and considerations that guide the grading process:
- Horizontal vs. Vertical Adjustments: Horizontal grading refers to the adjustment of the width of a pattern (e.g., bust, waist, hips), while vertical grading refers to adjusting the length (e.g., garment length, sleeve length). Both types of adjustments are critical to ensuring a proper fit.
- Larger Grading Increments for Larger Sizes: As the size increases, the grading increment also typically increases. This is because larger sizes need more room across the body, and the increase in size is more pronounced than in smaller sizes.
- Proportions and Fit: When grading, the proportions of the body must be considered. The grading should ensure that the garment maintains its shape and style across different sizes. For example, a curvier body might require different grading adjustments than a more rectangular body type.
- Ease and Comfort: When grading, designers also need to take into account ease (extra room in the garment for comfort) and style ease (additional room for the intended silhouette). Different styles (e.g., tight-fitting vs. loose-fitting) require different grading strategies.
- Fabric Considerations: The type of fabric also plays a role in the grading process. Stretch fabrics may not require as much grading as woven fabrics, and fabrics with a lot of drape may need more careful consideration when graded.
- Tools and Software for Pattern Grading
For those looking to grade patterns professionally or with greater efficiency, there are several tools and software programs available:
- Manual Tools: These include rulers, curve rulers, grading rulers, French curves, and pattern paper. Manual grading can be done with these tools, although it requires precision and attention to detail.
- Grading Software: Several computer-aided design (CAD) programs are available for pattern grading, such as Gerber AccuMark, Optitex, and Lectra. These programs allow designers to apply grading rules automatically and make the process much faster and more accurate.
- Pattern Design Software: In addition to grading software, pattern design programs like Adobe Illustrator, CorelDRAW, and Clo3D can be used to create patterns digitally and adjust sizes. Many of these tools offer specialized grading features, such as scaling and automatic sizing adjustments.